Nevada County
Local Resources
- The County of Nevada Nonprofit monthly office equipment giveaway. They computer equipment as well as office supplies and furniture. Last Friday of the month at the stoplight warehouse.
- Briar patch has several programs for nonprofits: https://briarpatch.coop/giving-back/
- Connect with United Way NC https://uwnc.org/become-a-uwnc-partner
- Local Volunteer Center
 : A resource for finding volunteer opportunities in your local community. People are looking for ways to give back to their community and make a positive impact, some may consider checking out their local volunteer center. These organizations provide a wealth of resources and opportunities for volunteers, including information on local volunteer opportunities, resources for volunteer management and coordination, and training and support for volunteers. To find your local volunteer center, simply search online for “local volunteer center” followed by the name of your city or region.
Regional Resources
- eScript for local donations at Grocery Stores www.escrip.com
- CVS grant for giftcards for nonprofits https://www.cvshealth.com/social-responsibility/our-giving
- Home depot project grants for nonprofits (gift cards) https://corporate.homedepot.com/page/home-depot-foundation
- Foundation Directory Online
 : Free access from your local library.
A database of foundations and grants, available for free through many libraries. Foundation Directory Online is a comprehensive database of foundations and grants, providing valuable information on funding opportunities for nonprofits. This resource is available for free through many libraries, providing organizations with a convenient and affordable way to research funding opportunities and plan their fundraising strategies. To learn more about Foundation Directory Online and how it can help your nonprofit, visit https://fdo.foundationcenter.org/. candid?
Online resources
This is not an exhaustive list, nor is it sorted in any particular order. Although, the ones at the top are more generally useful to the nonprofit. Many of them use techsoup.org to verify nonprofit eligibility.
Technology Help
- Online Impacts – a 501(c)(3) nonprofit organization that develops/hosts websites, provides digital marketing guidance, and creates technology solutions for impact-based nonprofits – https://onlineimpacts.org/ – Online Impacts is a great resource for nonprofits looking to maximize their impact. They offer comprehensive web development, marketing, and tech solutions to help organizations create meaningful change.
- NTEN – technology resources for nonprofits – https://www.nten.org/ – NTEN is a nonprofit that provides technology resources, best practices, and training for nonprofits to help them use technology more effectively. They also offer free webinars, conferences, and other events for nonprofits to learn and network.
- Idealware – tech training for nonprofits – http://idealware.org/ – Idealware provides tech training and resources specifically tailored for nonprofits, making it a great way for organizations to stay up to date on the latest tech tools.
- Nonprofit Tech for Good An informative blog with easy-to-understand information, news, and resources related to nonprofit technology, online communications, and social and mobile fundraising. https://www.nptechforgood.com/about-nonprofit-tech-for-good/
- Whole Whale
 : A nonprofit digital consultancy with resources and expertise available for free. Whole Whale is a nonprofit digital consultancy that provides a range of resources and expertise to organizations looking to maximize their impact through technology. From website design and development to data analysis and strategy, Whole Whale provides nonprofits with the tools and support they need to succeed in the digital age. And the best part? Their resources and expertise are available for free. To learn more about Whole Whale and how they can help your nonprofit, visit https://wholewhale.com/.
- Techsoup – discounted software – https://www.techsoup.org/ – Techsoup is a great resource for nonprofits looking to save money on technology. They offer discounted software licenses and hardware, as well as training and other resources to help nonprofits succeed.
Hardware
- Good360 – donated goods for nonprofits – https://good360.org/ – Good360 is an organization that provides nonprofits with donated goods such as school supplies, clothes, baby items, computers, etc. Their service is free for qualifying nonprofits, and a great way for organizations to get the items they need to succeed.
- ConnectAll – technology for nonprofits and people with low income – https://connectall.org/ – ConnectAll is a great resource for nonprofits and people with low incomes, offering discounted access to technology resources.
Cloud Services
- Google – https://www.google.com/nonprofits/
- Google Workspace for Nonprofits – free productivity suite -https://www.google.com/nonprofits/offerings/workspace/ – Google Workspace for Nonprofitsis a suite of tools designed to help nonprofits collaborate, communicate, and get work done more efficiently. It includes tools like Gmail, Drive, Calendar, Hangouts, and more.
- Google Ad Grants – free online advertising – https://www.google.com/grants/ – Google Ad Grants is a free online advertising program that helps nonprofits reach new audiences. It provides free ad credits that can be used to promote the organization’s website and message.
- Youtube Nonprofit Program – https://www.google.com/nonprofits/offerings/youtube-nonprofit-program/ – Engage your supporters using video with the YouTube Nonprofit Program. Unlock the power of video storytelling, so you can reach a global audience and amplify your cause. Plus, make it easy for supporters to give with YouTube Giving features (currently available in the U.S.).
- Google Earth Nonprofit – https://www.google.com/nonprofits/offerings/google-earth-and-maps/ – Google for Nonprofits provides Google Maps Platform credits to nonprofits. Show your nonprofit’s impact with Google Earth and Maps. Develop compelling data visualizations to track and share your organization’s impact. Plus, use Google Maps Platform to help people locate community programs and resources closest to them.
- Microsoft
- Office 365 for Nonprofits – productivity suite – https://www.microsoft.com/en-us/nonprofits – Microsoft Office 365 offer a variety of tools and resources to help nonprofits stay productive and efficient.
- Azure for Nonprofits – https://www.microsoft.com/en-us/nonprofits/offers-for-nonprofits – Leverage $3,500 (USD) Azure services credits per year and access the complete portfolio of Azure products and cloud services. Sign up for the Nonprofit Azure Onboarding Concierge and Success Center to set up your credits.
- Canva for Nonprofits – https://www.canva.com/canva-for-nonprofits/– Canva for Nonprofits is a free design tool that allows nonprofits to create beautiful visuals for websites, social media, and other marketing materials.
- Slack for Nonprofits – https://slack.com/nonprofit – Slack is a great way for teams to communicate and collaborate in real-time. Slack for Nonprofits provides additional features and discounts to help nonprofits stay connected.
- Asana for Nonprofits – https://asana.com/nonprofits – Asana is a great tool for project management and task organization. Asana for Nonprofits provides discounts and additional features to help nonprofits stay organized.
- Cloudflare – https://www.cloudflare.com/ – Cloudflare provides reliable and secure web services to nonprofits of all sizes, making it easier for them to reach their audiences and expand their reach online. With its free plan, nonprofits can use a range of services to boost their online presence, including enhanced security, faster page loading times, and improved performance
- Box.org – free cloud storage for nonprofits – https://www.box.com/industries/non-profit – Box.org provides free cloud storage for nonprofits. It’s a great way for nonprofits to securely store, share,and access data, documents, and other files.
- CivicChamps – managing volunteers – https://www.civicchamps.com/ – CivicChamps is a great way for nonprofits to recruit, manage, and track volunteers. It offers 50% off to help nonprofits save money.
- Dreamhost – web host provider – https://www.dreamhost.com/ – Dreamhost is a web host provider that offers free shared website and email hosting for nonprofits. It’s a great way for organizations to save money on web hosting costs.
- eBay – waives selling fees for Nonprofits – https://charity.ebay.com/for-nonprofits/ – eBay waives their selling fees for nonprofits, making it an easy and cost-effective way to raise money for causes.
- T-Mobile Network – unlimited Internet 4G WiFi Hotspot for nonprofits for $10/month with $18 for hotspot device – www.mobilebeacon.org/ – The T-Mobile Network offers unlimited 4G internet for nonprofits at a discounted price of $10/month and $18 for a hotspot device.
- PayPal Giving Fund – donations for nonprofits – https://www.paypal.com/us/webapps/mpp/donations – PayPal Giving Fund is a great way for nonprofits to receive donations from PayPal users. It’s a free service that makes donating easy and secure.
- Facebook Fundraisers – donations for nonprofits – https://www.facebook.com/fundraisers – Facebook Fundraisers are a great way for nonprofits to reach a larger audience and raise money for their cause. They provide an easy and secure way for users to donate to their favorite nonprofits.
- Salesforce Nonprofit Cloud – free CRM software – https://www.salesforce.org/nonprofit – Salesforce Nonprofit Cloud is a free Customer Relationship Management (CRM) software designed to help nonprofits build better relationships with their donors and supporters.
- GitHub Nonprofit Program – free developer tools – https://socialimpact.github.com/ – GitHub Nonprofit Program provides free developer tools and services to help nonprofits build software and manage projects.
- MailChimp
 : An email marketing platform with a free plan for nonprofits. Mailchimp offers a range of features including email design templates, automation, and analytics. Nonprofits can send up to 12,000 emails to 2,000 subscribers per month for free. Check it out at: https://mailchimp.com/
- Hubspot
 : A comprehensive marketing, sales, and customer service platform with a free nonprofit plan. Hubspot offers a range of features including website builder, email marketing, and a CRM. Nonprofits can access all the tools for free, with no time limits or restrictions. Learn more at: https://www.hubspot.com/
- Buffer
 : A social media management tool with a free plan for nonprofits. Buffer allows nonprofits to schedule, publish, and analyze posts on multiple social media platforms from one place. Nonprofits can access the basic plan for free, including support for three social media profiles. Get started at: https://buffer.com/
- Otter.ai
 : An AI-powered tool for transcribing and recording meetings, available for free to nonprofits. Otter.ai uses AI to transcribe and organize audio and video recordings in real-time. Nonprofits can access 600 minutes of transcription per month for free. Find out more at: https://otter.ai/
- Givelively : A fundraising platform that is free for nonprofits to use. Givelively offers a range of features including online fundraising pages, donation processing, and donor management. Nonprofits can use the platform for free, with no transaction fees or hidden costs. Get started at: https://www.givelively.org/
- Mobilize
 : A platform for organizing volunteer events and campaigns, available for free to nonprofits. Mobilize makes it easy for nonprofits to recruit, manage, and mobilize volunteers. Nonprofits can use the platform for free, with no limits on the number of volunteers or events. Sign up at: https://mobilize.us/
- LinkedIn : A professional networking platform with a free nonprofit account. LinkedIn is a platform designed for professional networking, connecting millions of professionals from around the world. Nonprofits can take advantage of LinkedIn’s free nonprofit account, which provides access to a wealth of resources and tools to help organizations build their online presence and connect with potential supporters, partners, and collaborators. To learn more about the free nonprofit account offered by LinkedIn, visit https://business.linkedin.com/non-profits.
- ClickUp
 : A project management tool with a free plan for nonprofits.ClickUp is a comprehensive project management tool that can help organizations of all sizes streamline their workflows and collaborate more effectively. The tool is available for free to nonprofits, offering a range of features and tools to help organizations stay organized and on track, including task management, project tracking, and team collaboration. To learn more about ClickUp and how it can help your nonprofit, visit https://clickup.com/.
- Webflow
 : A website design and development platform that offers a free plan for nonprofits. With Webflow, nonprofits can create beautiful, functional websites without having to write code. Nonprofits can take advantage of Webflow’s intuitive design tools, extensive design library, and customizable templates to create a website that meets their unique needs. To get started with Webflow, visit https://webflow.com/
- Codesandbox
 : A code editor and development environment that is available for free to nonprofits. Codesandbox provides a collaborative environment for developers to create and test their code, making it easier for nonprofits to build and maintain their websites and applications. To access Codesandbox, go to https://codesandbox.io/
- Twilio.org – https://twilio.org
Twilio offers free and discounted access for nonprofits to it’s powerful SMS and messaging platform. They are a proud member of the Pledge 1% for companies, redirecting 1% of their profit to social impact. They also run an annual impact fund for funding direct ideas in the community using SMS. More about this on our podcast with Twilio.org. - Okta Cloud-based identity management platform for nonprofits. Okta offers a discount to eligible nonprofits, providing up to 50 free licenses for their identity management.platform.https://www.okta.com/nonprofits/
- Loom
 : A screen and camera recording tool with a free plan for nonprofits. Loom is a screen and camera recording tool that makes it easy to capture and share video content with others. The tool is available for free to nonprofits, providing organizations with a convenient and affordable way to create and share videos for a variety of purposes, including fundraising, marketing, and community engagement. To learn more about Loom and how it can help your nonprofit, visit https://www.loom.com/.
- GrantAdviser – a safe way to anonymously give and receive feedback on grantmaking – https://grantadvisor.org/ – GrantAdviser is a platform that allows nonprofits to review and rate their grantmaking experiences. It provides a safe and anonymous environment to share experiences and feedback that can help other organizations.
- Charity Navigator is a nonprofit that rates charities in the US based on financial health, accountability, and transparency. Their rating system uses one to four stars. They also offer resources for donors and a paid service for personalized giving recommendations. Visit their website at: https://www.charitynavigator.org/
You don’t pay taxes on communication services if you are certain type of nonprofit.
Other ideas
ewaste drives
Further reading
https://www.idealist.org/en/fundraising-resources/free-or-low-cost-services
]]>Federal Level:
- Supplemental Nutrition Assistance Program (SNAP) (previously known as Food Stamps)
- Temporary Assistance for Needy Families (TANF)
- Medicaid
- Housing Choice Voucher Program (Section 8)
- Low-Income Home Energy Assistance Program (LIHEAP)
- Supplemental Security Income (SSI)
- Child Care and Development Fund (CCDF)
- National School Lunch Program (NSLP)
- Women, Infants, and Children (WIC) Program
- Earned Income Tax Credit (EITC)
- Community Services Block Grant (CSBG)
- Head Start
- Older Americans Act (OAA) Programs
- Supplemental Nutrition Program for Women, Infants, and Children (WIC)
- Children’s Health Insurance Program (CHIP)
- Social Services Block Grant (SSBG)
State of California:
- CalWORKs (California Work Opportunity and Responsibility to Kids)
- California Food Assistance Program (CFAP)
- CalFresh (California’s Supplemental Nutrition Assistance Program)
- In-Home Supportive Services (IHSS)
- California Emergency Assistance and Rapid Transition to Housing (CEART)
- Energy Assistance Fund (EAF)
- Low-Income Home Energy Assistance Program (LIHEAP)
- Women, Infants, and Children (WIC) Program
- School Breakfast and Lunch Programs
- Medicaid (Medi-Cal)
- Health Care for Kids and Families (HCKF)
- Child Care Assistance
- Earned Income Tax Credit (EITC)
- Section 8 Housing Choice Voucher Program
- Community Services Block Grant (CSBG)
- Social Services Block Grant (SSBG)
- Head Start
- Older Americans Act (OAA) Programs
Nevada County, California:
- Nevada County Food Bank
- Interfaith Food Bank
- Nevada County Health and Human Services Agency
- Western Sierra Medical Clinic
- Chapa De Clinic
- Hospitality House
- The Salvation Army of Nevada County
Nonprofit services in Nevada County, California
- Hospitality House
- The Salvation Army of Nevada County
- Community Legal Services of Empowerment
- Interfaith Food Ministry
- Nevada County Free Clinic
- The Resource Connection
- Hospice of the Foothills
- Sierraservice Corps
- Western Sierra Medical Clinic
- Women’s Health Specialists
- Nevada County Nurtured Heart Approach
- Sierra Senior Services
- Boys and Girls Club of Western Nevada County
- Grass Valley Food Co-op
- Nevada County Volunteer Center
- Friends of Nevada County Libraries
- Sierra Nevada Memorial Hospital Foundation
Note: This is not an exhaustive list, and program names, eligibility criteria, and benefits may vary by state.
My experience
I’m consistently amazed at the level of assistant you can get from government, and non-profit organizations if you make less than 21K-40K a year. Here are programs I’ve had personal experience with. Also, some extra money saving tips.
For a comprehensive list of services (Dial 211 or visit www.dial211.com) I feel like their website is very hard to navigate. If it was better than there would be no need for this blog post.
Bottom Line: Minimize buying, but when you do, buy used and buy locally. For instance: Gold Country Craigslist, Nevada County Swap Shop Facebook group, thrift stores, yard sales, and sort by distance on eBay.
Cash Aid
- Calworks
- Unemployment
- Disability or Paid family leave
- Business grants
- Supportive Services
Food
We are incredibly lucky. We have an immense good food network. I only eat organic, non-GMO, no sugar and local meat.
- Food banks (Staples, as well as organic, local produce)
- Interfaith Food Ministry – open every Mon, Wed, and Fri. You can go every two weeks. Bring your social security card your first visit. Be sure to return any food you do not want before you leave. http://www.interfaithfoodministry.org/
- NC food bank – Open once a month, view calendar here: Calendar
- Food stamps (EBT or Calfresh) Sign up online – 1-877-847-3663. I get around $200/month.
- TIP: If you’re in a hurry, at Natural Selections you can buy locally premade Way Yum sushi, Theresita’s Haute Tamales, or Warehouse deli sandwiches with your EBT card!
- TIP: You can use EBT at the Nevada City Farmers Market
- TIP: You can use EBT to mail order food from Amazon or Walmart.
- Markets: Nevada City farmers Market, EBT, and $25 free voucher.
- Stores: Grocery outlet (Pick out the organic food), Natural Selections (Clearance shelves)
- Free School Lunch Program
- WIC if you are pregnant or have a child you can get food and a free breast pump. They also provide tokens for the Nevada City farmers’ market.
TIP: Save your vegetable scraps and meet scraps in the freezer to make vegetable and bone sock respectively.
TIP: Eat your food in the order that it will perish. Regularly eat all the food in your fridge.
TIP: Save your bacon grease. Cook with it, or make soap.
TIP: Nut/seed/grain milk is super easy to make. Kefir/Yogurt. Kombucha/jun. SaurKraut/Kimchi, Sprouts.
More info here: http://211nevadacounty.org/resources/food/
Housing
Federal Subsidized housing
Grass Valley First Time Home Buyer Program
Nevada County Habitat For Humanity Homeownership Program
Nevada County weatherization program Project Go call 1-800-655-7705
PGE Weatherization program
Habit for humanity REstore
Regional Housing Authority of Sutter and Nevada County
Utilities
PG&E Care program – Gives a discount on Electricity and Natural Gas
Project Go For Energy Assistance, please call 1-888-524-5705 – Will pay your PG&E for a year, and/or will provide vouchers for wood, or propane.
Ferrelgas w/ neighborhood association or refurbished tank.
TIP: Composting toilet
TIP: Dryer lint and tp rolls for firestarters
TIP: Dry your clothes on a line!
TIP: Use cold water to wash your clothes.
TIP: If you use the dryer, add a dry towel with your wet clothes to speed up drying, or use wool dryer balls.
Phone and cellphone
California and Federal Lifeline programs – A free cellphone and service, or a discount on your landline. For more info check out my article here: The Cell Phone Guru blog post
(Sprint) Freedompop – 200 Voice Minutes 500 Text Messages 500MB 3G/4G Data with $99 phone +$10 s/, OR activate your own Sprint phone for $20. Not limited to low income users.
Google Voice with Hangouts and dailer- free wifi calling for your smart phones or computers. Not limited to low income users.
MVNO’s: Republic Wireless (Sprint, Verizon, Wifi), Pageplus (Verizon), Airvoice (ATT) Not limited to low income users.
Internet
More info here: http://www.cheapinternet.com/low-income-internet
(Sprint) Freedompop – 500MB/month 4G connection free with $30 + $10 s/h hotspot purchase. Not limited to low income users.
(Sprint) Netzero – 200MB/month for a year.$76.90 for device and s/h. Not limited to low income users.
(T-mobile) http://basic-internet.com/everyoneoncampaign/ – $10/month hotspot for $62.51 1.2GB at 4G speed, then unlimited at 3G for month.
(Comcast) http://www.internetessentials.com/ – Most have a child that qualifies for some school lunch program. Actually you have tons of options if you qualify for school lunch programs.
(Sprint) https://yourkarma.com/
(ATT) Sonic – semi-local DSL company
Gas
TIP: Gasbuddy
scooter
electric bicycle
bicycle
Medical
Medi-cal @ Western Sierra Medical Center General and dentist, vision dr. moon, equine therapy
Women’s health specialist w/ qwest and fee waiver
Vehicle Insurance
Minimum insurance or
Pay as you go: Metromile
Banking
FirstUS Credit Union – Free checking and savings
River Valley Community Bank – Free checking and savings
School
Sierra College: FAFSA, Governor Fee Waiver
Business
Nevada City Small Business Loans and Grant
David Nelson – Nevada City CDBG Program Manager
http://nevadacityca.gov/sites/all/modules/tinytinymce/tinymce/jscripts/tiny_mce/plugins/filemanager/files/admin/EconomicDevel.pdf
Sierra commons
Kickstarter Indiegogo, etc…
Website hosting
HangLeft Hosting
Software:
Ubuntu
Open source software
Sundries
Use white vinegar to clean everything
Make your toothpaste
Use soap nuts for soap or make it
Use apple cider vinegar and baking soda to wash hair, coconut oil to condition
coconut oil for all lotion, moistorizer, sunblock
Use reusable toilet rags instead of toilet paper
Petfood: Animalsave program or make your own.
Make cloth bags for bulk items and produce
Store vegetables in cloth bags or dish towels
More resources
These are the programs that I personally use. A resourced, single, white male living in Western Nevada County. If you are a person without reliable transportation, a person without a permanent home, a person with two X chromosomes, a person with children, a person with a disability, a person suffering from chronic illness, a person who has suffered violence, a person suffering from addiction, a person that has served in the military, a person with more than 65 years under your belt, of you live in Eastern Nevada County, check out the site below where you will find even more services.
Nevada County Community Resource Directory (available 24 hours a day)
Emergency Assistance Coalition (EAC)
877-847-0499 (Dial 211 / www.dial211.com)
You can view Nevada County’s 2014-2015 Cummunity Action Plan (CAP) that was created so that we could receive the $1.6M Federal CSBG* grant that helps fund these services here: CAP. Note: Each non-profit that applied and was approved got $60K/year for 2 years.
*The Community Services Block Grant (CSBG), administered by the states, provides core funding to local agencies to reduce poverty, revitalize low-income communities and to empower low-income families to become self-sufficient.
]]>Broadband: 25Mbps down, 3Mbps up, and less than 100ms latency.
Neither fiber nor cable is available where I live. All the fixed wireless providers in Nevada County don’t serve my property. AT&T will provide me a DSL line running at the insanely slow speed of 768kbps. That’s around 90 Kilobytes per second download, and don’t get me started on upload. Although, better than a 56K modem, it’s not fast enough for my needs. Geosynchronous satellite’s latency is too high for real time interaction. Low earth satellite is not available yet. AT&T is the only cellular provider with adequate coverage, however only on the new LTE band 14, all the other bands are spotty. FirstNet LTE Band 14 has been installed all over the Country by AT&T funded by a giant grant from the Federal government. My options are really quite limited. Luckily, I did eventually find something that works. Check out all the internet options in Nevada County here:
https://jphein.com/internet-options-in-nevada-county/
Here is a list of phones that have this LTE band 14:
https://www.firstnet.com/devices/phones.html
A complete list of devices is here:
https://www.firstnet.com/content/dam/firstnet/white-papers/firstnet-certified-devices.pdf
AT&T does not offer an inexpensive unlimited plan (<$100/month). Thus began my search for someone that did. I started out searching the Wiki article of all the MVNOs. (Mobile Virtual Network Operators) All the folks that resell time on the 4 major USA networks. I sorted it by the network column so I could filter all the AT&T MVNOs: https://en.wikipedia.org/wiki/List_of_United_States_mobile_virtual_network_operators
Then I found the article below,
https://www.rvmobileinternet.com/gear/att-unlimited-rental-plans/
which pointed me to:https://www.cgcellular.com/ Which provides unlimited data on AT&T for $60. Definitely the least expensive I’ve found. *No longer offering this. Instead check out how to get unlimted data for free here: jphein.com/lifeline
All AT&T Wireless unlimited plans supposedly deprioritize your data if your local cell tower is congested after 22GB. I don’t think it happens much in rural areas.
I purchase the Netgear Nighthawk M1 (MR1100) directly from my local AT&T store. Although, now you can buy one used on eBay.
Be sure to get the MR1100-2A1NAS model. The first consumer model does not support band 14. Read about it here: https://community.netgear.com/t5/Mobile-Routers-Hotspots-Modems/Pre-April-Nighthawk-and-band-14-and-46/m-p/1555303#M5746
It supports all LTE bands that AT&T uses. It was ~$270 with tax purchased outright. I put it on the $10/month for 100MB BYOD business plan. They waived any activation fee. I was able to unlock it after 60 days, and discontinued the original $10 plan.
https://www.att.com/deviceunlock/unlockstep1
Although, not necessary to unlock it for any AT&T reseller. I unlocked it in case in the future I need to use it with T-mobile, or Verizon.
Although currently locked to AT&T, I can use it with any AT&T MVNO by changing the APN setting from the web gui.
http://attwifimanager/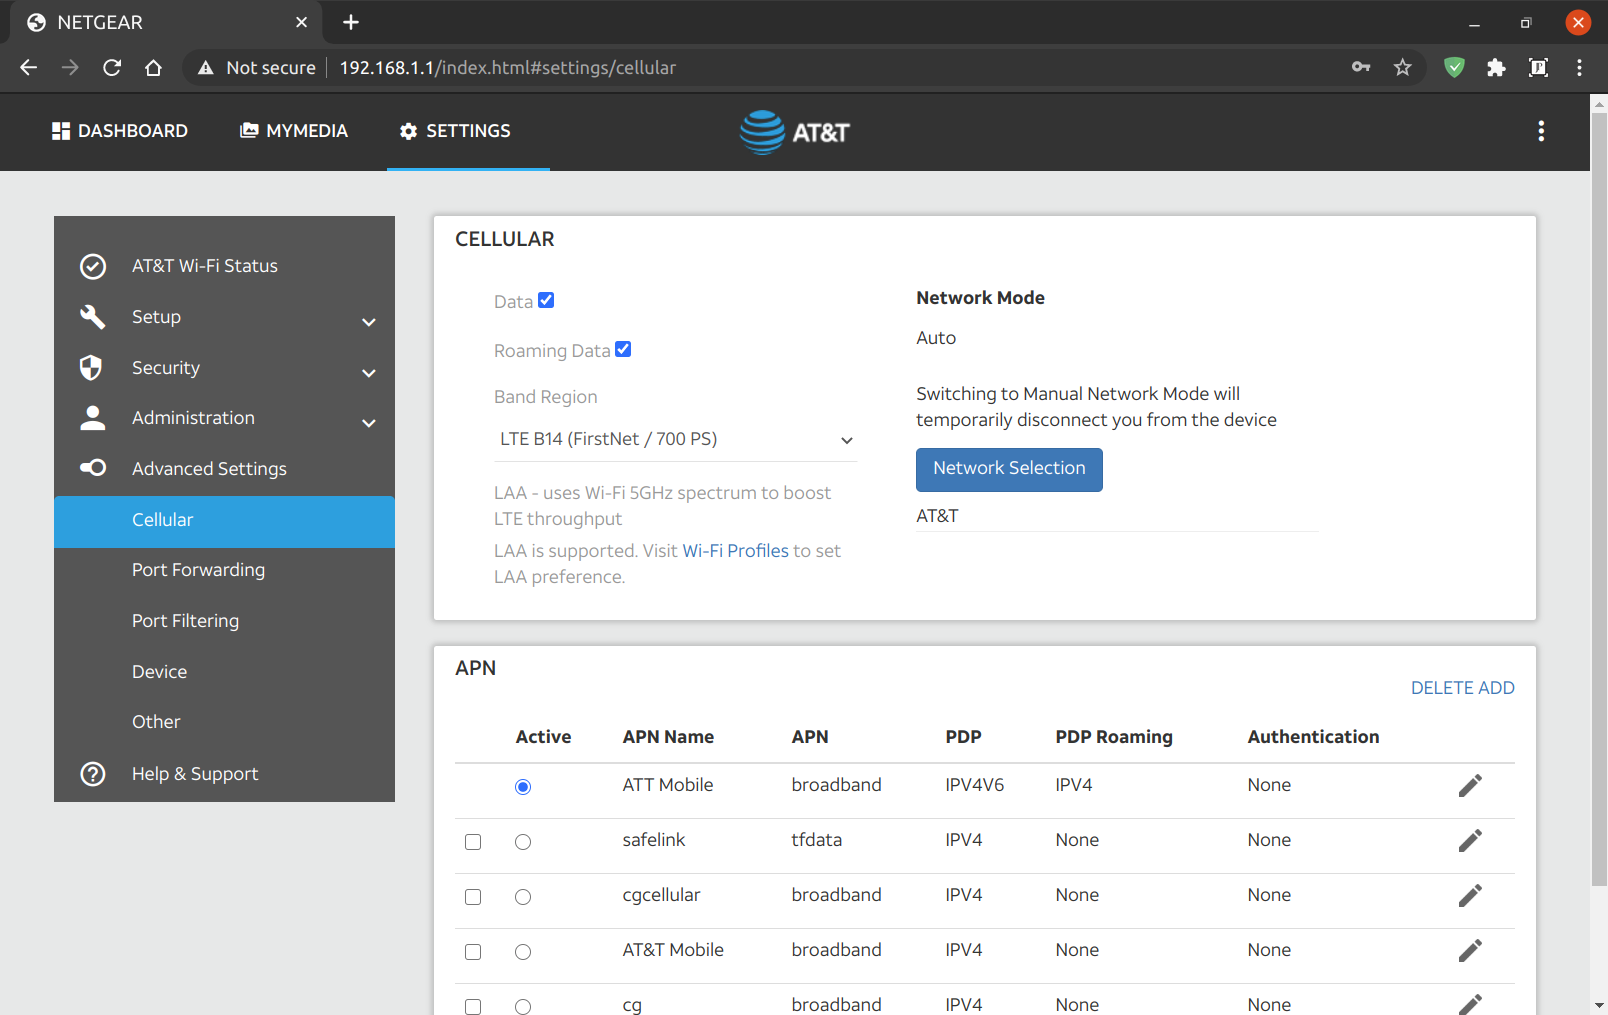
By plugging in the USB to my computer, and telnetting into the M1. I played around with the different LTE bands around my home, and various combinations using carrier aggregation.
#Open a terminal
telnet 192.168.1.1 5510
Edited the band selection dropdown:
AT!gstatus?
AT!band=?
AT!BAND=03,"LTE B2 (1900 MHz PCS)",           0,  2
AT!BAND=04,"LTE B4 (1700/2100 MHz AWS)",      0,  8
AT!BAND=05,"LTE B12 (700 MHz Lower B/C/A)",   0,  800
AT!BAND=06,"LTE B14 (FirstNet / 700 PS)",     0,  2000
AT!BAND=07,"LTE B30 (2300 MHz WCS)",          0,  20000000
AT!BAND=08,"LTE B66 (AWS-3)",                 0,  0,          2
AT!BAND=09,"LTE CA (B2+B4+B12+B14+B30)",      0,  2000280a
You need to reboot the router before the changes show up in the web gui.
I connected to each band individually, and ran a speed test. I then ran a speed test with all bands aggregated. Carrier aggregation with Band 14 doesn’t seem to work. Also, the builtin All LTE option doesn’t seem to choose Band 14. However, when I choose it manually, I get a great connection. Simply locking the device to use Band 14 gave me the best speeds.
LTE Band 14 with WiFi turned off sitting on my desk.

Much better than 0.768Mbps DSL, but not quite broadband.
I took it outside and set it facing the direction of the tower.

Sweet! Broadband Internet. I’ll make an enclosure for it, and run power and ethernet out to it.
I will order a pair of yagis. A type of directional antenna. For even faster speeds. FirstNet public safety LTE in the United States occupies two 10-MHz-wide blocks of spectrum at 758 MHz to 768 MHz (download), and at 788 MHz to 798 MHz (upload). So, I’ll be sure The antennas support those frequencies. The M1 has two external TS9 antenna ports.

Technical Specification
| Frequency Range | 698 – 894 MHz |
| Gain | 8dBi |
| Front to Back Ratio | bigger than 15dB |
| Impedance | 50 ohms |
| VSWR | Less than 1.5 |
| Cable Loss | 0.075 dB |
| Vertical Plane | 72°F ± 5°F |
| Horizontal Plane | 76°F ± 5°F |
| Polarization Type | Vertical or Horizontal |
| Connector Type | SMA Male |
| Number Of Element | 4 |
| Length without Cable | 37 cm |
| Weight | 0.7 Kg |
| Rated Wind Velocity | 150 Mile per Hour |
| Working temperature | -40°F ~ +140°F |
I had to order some SMA ends to shorten the antenna cable. You lose signal for every inch long your antenna cable is. I also ordered SMA to TS9 pigtails, and an outdoor enclosure.
I’ll set them up 90 degrees offset pointing at the same tower. I found my tower location using Opensignal app, then I used Google earth to find the heading. Which was for me 38 magnetic degrees from my house to the tower. I then used a compass app, or google maps to know where to point the antennas. I’m sure it will take some fine tuning. This is a great guide for doing line of sight with Google earth:
https://startyourownisp.com/posts/guide-to-google-earth/
{Speedtest}
There are three ways to use the M1 as a modem. You can connect via ethernet, USB, or WiFi. I found the best performance was wither USB or Ethernet with WiFi off.
#Check IMEI
ati#Restore corrupted IMEI
To unlock your NV:
https://github.com/bkerler/SierraWirelessGen
Installation
- Get python >=3.6 64-Bit~>
- git clone https://github.com/bkerler/edl/ ~>
- chmod +x edl/modem/sierrakeygen.py ~>
- cd edl/modem
- pip3 install -r requirements.txt
at!openlock?
./sierrakeygen.py -l <challenge> -d MDM9x40
AT!OPENLOCK="<generatedresponse>"
at!nvimeiunlock
#at!nvmeidunlock
at!nvencryptimei=xx,xx,xx,xx,xx,xx,xx,x0
#at!nvencryptmeid=xx,xx,xx,xx,xx,xx,xx
atiInstall and Configure WireGuard
From: https://www.stavros.io/posts/how-to-configure-wireguard/
Note: for the client configuration to work you must first have a working wireguard server.
#become root
sudo -i

#install wireguard
apt install wireguard

#create keys
cd /etc/wireguard
umask 077  # This makes sure credentials don't leak in a race condition.
wg genkey | tee privatekey | wg pubkey > publickey
#edit the config
nano -w wg0.conf
Client (Example config file) – wg0.conf
Add the client private key, the server public key, and the server IP address.
[Interface]
Address = 10.5.5.25
PrivateKey = client private key

#-------------DNS
#DNS = 10.5.5.1 #Server caching dnsmasq that forwards to azure in my case
#DNS = 168.63.129.16 #Azure
#DNS = 1.1.1.1 #Cloudflare
DNS = 176.103.130.130, 176.103.130.131 #AdGuard

#-------------MTU
MTU = 1280 #This may need to be changed depending on your connection to the internet.
#MTU = 1384
MTU = 1360

#-------------MSS Clamping
#PostUp = iptables -A FORWARD -p tcp --tcp-flags SYN,RST SYN -j TCPMSS --clamp-mss-to-pmtu
#PostDown = iptables -D FORWARD -p tcp --tcp-flags SYN,RST SYN -j TCPMSS --clamp-mss-to-pmtu


[Peer]
PublicKey = server public key
Endpoint = server IP address:51820
#AllowedIPs = 0.0.0.0/0 #Use this if you want all your traffic to pass through the VPN
AllowedIPs = 10.5.5.25/32

# This is for if you're behind a NAT and
# want the connection to be kept alive.
PersistentKeepalive = 25
Server (Example config file) – wg0.conf
Add the server private key, and each client’s public key.
[Interface]
Address = 10.5.5.1
PrivateKey =
ListenPort = 51820

[Peer]
PublicKey =
AllowedIPs = 10.5.5.5/32

[Peer]
PublicKey =
AllowedIPs = 10.5.5.25/32
Securing
After you’re done, run the following to make the directory and files readable only by administrators (it does contain secret keys, after all):
exit # exit rootsudo chown -R root:root /etc/wireguard/
sudo chmod -R og-rwx /etc/wireguard/*
Start and test wireguard
On both server, and client run:
sudo wg-quick up wg0; wg
#to bring it down
sudo wg-quick down wg0
Automatically run at startup
After you’ve created and secured the file, you can easily set WireGuard to initialize the VPN on startup if your OS is using systemd:
sudo systemctl enable [email protected]
Similarly, to start or stop the service:
sudo systemctl start [email protected]
sudo systemctl stop [email protected]
Android or iOS client
To turn your conf file into a qr code use:
qrencode -t ansiutf8 < wg0.confSet up DNS on the server
From: https://askubuntu.com/questions/1032450/how-to-add-dnsmasq-and-keep-systemd-resolved-18-04
Install openresolv on client
apt install openresolvInstall dnsmasq on server
apt install dnsmasq
nano -w /etc/dnsmasq.conf
server=168.63.129.16 #Azure
#server=176.103.130.130, 176.103.130.131 #Adguard
interface=lo
listen-address=10.5.5.1
bind-interfacesMake DNSMasq start after our wg-quick service:
systemctl edit dnsmasqpaste
[Unit]
[email protected]
[email protected]
Firewall on server
Allow udp port 51820 through your firewall in whatever cloud service you are using.
Allow Wireguard and DNS through local ufw firewall
ufw allow proto udp from any to any port 51820
ufw allow proto tcp from any to any port 53
From: https://ubuntu.com/server/docs/security-firewall
Make sure to edit the firewall policy’s in your cloud server’s management dashboard as well to allow port 52820. In my case, Azure.
sudo ufw status
Status: active

To                         Action      From
--                         ------      ----
22                         ALLOW       Anywhere
51820                      ALLOW       Anywhere
53                         ALLOW       Anywhere
/etc/default/ufw change the DEFAULT_FORWARD_POLICY to “ACCEPT”:
DEFAULT_FORWARD_POLICY="ACCEPT"
Then edit /etc/ufw/sysctl.conf and uncomment:
net/ipv4/ip_forward=1
Now add rules to the /etc/ufw/before.rules file. The default rules only configure the filter table, and to enable masquerading the nat table will need to be configured. Add the following to the top of the file just after the header comments:
# nat Table rules
*nat
:POSTROUTING ACCEPT [0:0]

# Forward traffic from eth1 through eth0.
-A POSTROUTING -s 10.5.5.0/24 -o eth0 -j MASQUERADE

# don't delete the 'COMMIT' line or these nat table rules won't be processed
COMMIT
sudo service ufw restartTest what is my ip, and dns leak
Gnome shell Indicator extension: https://extensions.gnome.org/extension/3160/wireguard-indicator/
Add a quicklaunch shortcut: https://blog.linuxserver.io/2019/11/24/connect-an-ubuntu-client-to-opnsense-wireguard-tunnel-with-a-gui-toggle-in-gnome/
]]>Right now there is a serious shortage of inexpensive quality Webcams. So, we have to get a bit creative. This setup works great in Linux for OBS, Duo, and Google Meets. It also works for Windows and MacOS. You can always buy a HDMI, OR USB extension cable if you need a longer cable. This setup can also do 1080p at 30fps. I would have loved to have the capture card use USB 3.0, but couldn’t find one for this low price. You can stream from the GoPro Wirelessly, but it adds too much latency for live streaming.
- $25 – Used GoPro Hero 3 White
https://rover.ebay.com/rover/1/711-53200-19255-0/1?ff3=4&toolid=11800&pub=5575164288&campid=5337848787&mpre=https%3A%2F%2Fwww.ebay.com%2Fitm%2FUsed-GoPro-HERO-3-White-1080P-5MP-HD-Sport-Action-Digital-Camera-Camcorder-WiFi%2F333445833543%3Fhash%3Ditem4da2eba347%253Ag%253AFdMAAOSwp2Vd%257EYg9%26LH_BIN%3D1%26autorefresh%3Dtrue - $5 – HDMI to Micro HDMI (D) Cable
https://amzn.to/33IPZzN - $10 – HDMI to USB 2.0 Capture Card
https://amzn.to/33KJDA2

Pros:
Great quality
Wide angle lens
Price
Cons:
There is a very slight delay. Maybe 20-40ms?
There are two cables coming from your Webcam (USB power & HDMI.)
Capture Card Info and Reviews
USB ID: 534d:2109
Chip: MacroSilicon MS2109 ASIC
https://www.cnx-software.com/2020/06/05/11-hdmi-to-usb-2-0-video-capture-dongle-supports-up-to-1080p30-grabbing/
OBS Settings:
https://bigl.es/friday-fun-10-hdmi-to-usb-capture/

Inspired by this portable secure gateway, I set up my own secure cloud gateway.
Using these three services, Wireguard VPN, Adguard Home, and Tor Anonymizing Proxy. Although TOR doesn’t recommend using TOR in conjunction with VPN’s or proxies, I like this setup the best. For this to work you need a router that can support Wireguard. I use a Netgear r6220 with the Linux based open source router OS, Openwrt. You can easily use any computer that runs Ubuntu instead.
The router I used: https://openwrt.org/toh/netgear/netgear_r6220
Configure your local router
Flash OpenWRT
Set Password
Set LAN subnet
Set Static DHCP lease for desktop
Set name and password for both Wifi Networks
Set Adguard DNS: 176.103.130.130, 176.103.130.131 on wan interface.
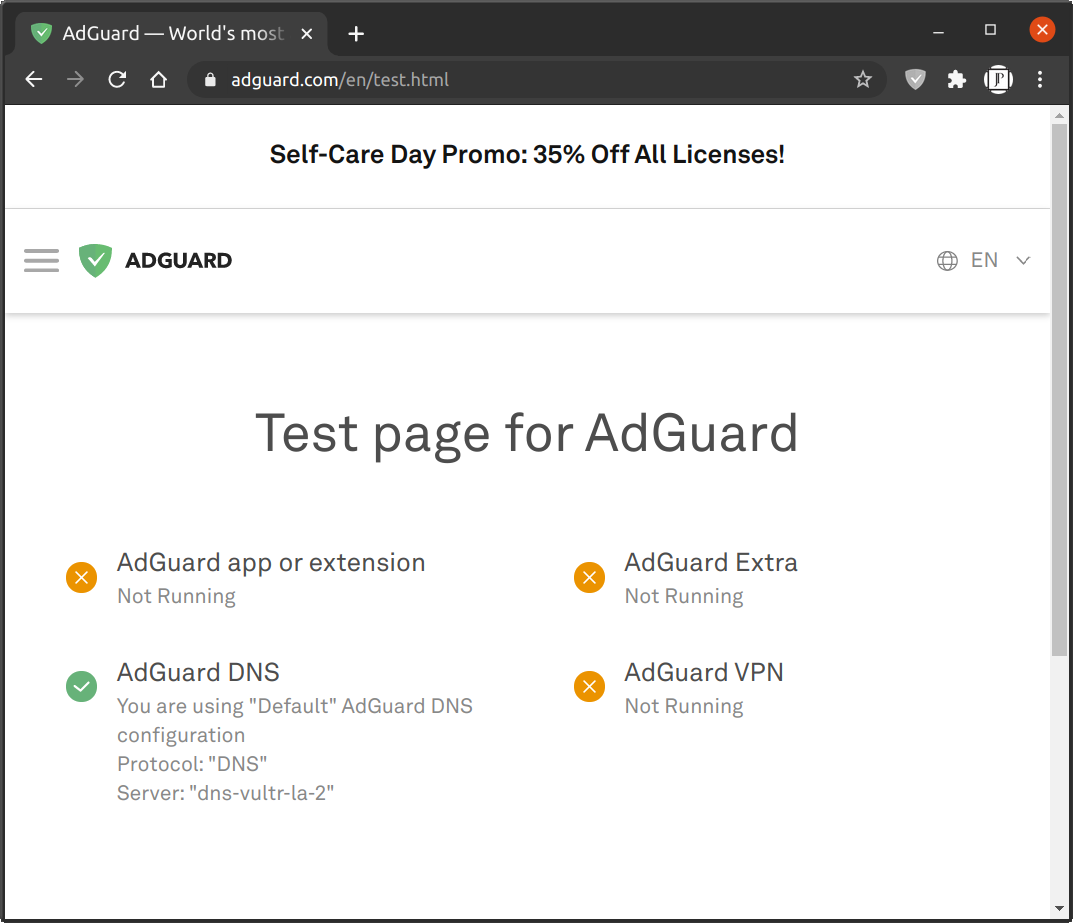
Update software lists..
Install nano, curl, ca-bundle, wireguard, etc..
opkg update
opkg install nano curl ca-bundle luci-app-wireguard
reboot
Wireguard
Set up Wireguard on your router with the below guide:
https://www.azirevpn.com/support/guides/router/openwrt/wireguard
Ignore the AzireVPN specific parts.
Time
From: https://forum.openwrt.org/t/initiate-wireguard-after-ntp-success/14751/52
A the end of the guide it says you have to sync the time with the browser after every reboot, because the router does not have a real time clock (RTC). Wireguard needs the time to connect to the other endpoint. However, I found that if you leave the OpenWRT time in UTC, then it shouldn’t need you to do that.
MTU
After making all these changes my upload speeds were terribly slow. To fix this I had to change the MTU of Wireguard interface to 1360. Stop the interface before changing the MTU I think Maybe because I use AT&T 4G which I think has a MTU of 1420.
QOS (SQM – Smart Queue management)
From: https://openwrt.org/docs/guide-user/network/traffic-shaping/sqm
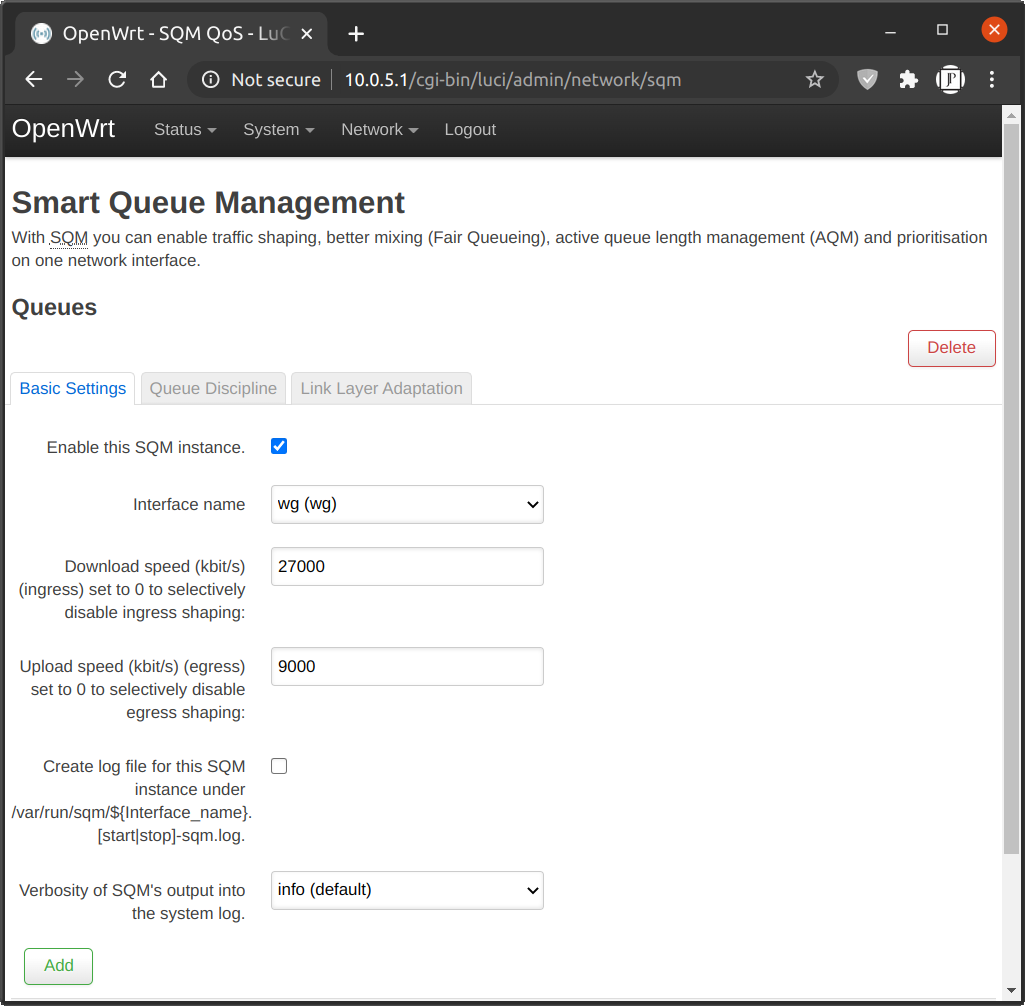
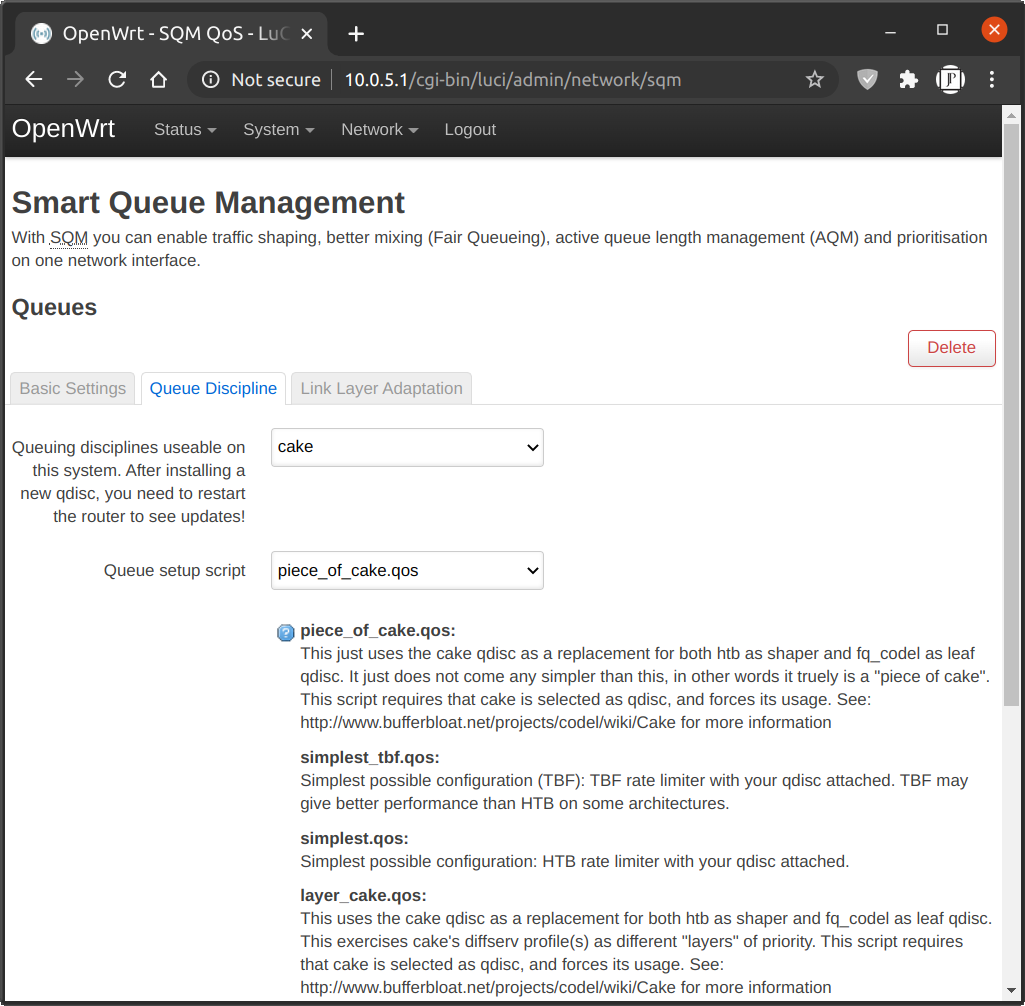
Even if you have nice low latency, low jitter, and high bandwitch up and down you can still experience slow internet. Especially if you do any uploading. Some people call this “buffer bloat”. SQM can mitigate that by managing your traffic to not saturate your upload or download.
You can test your buffer bloat here: http://www.dslreports.com/speedtest
opkg update && opkg install luci-app-sqm
reboot
Play with Download and Upload values until you get good speeds with no buffer bloat.
Configure your cloud server
I used Ubuntu 20.04 for my cloud server.
Follow the above guide.

Results: Over VPN with SQM.
The below needs more testing and fleshing out…
AdGuardHome (Optional)
Just using the AdGuard DNS is sufficient for most people, but if you’d like more control over your block lists, you can also install Adguard Home to either the Router, or the cloud gateway.
Gateway: For the gateway it can be done by using the below instructions, but I didnt have luck with the snap. This should let you configure the DNS lists locally.
https://github.com/AdguardTeam/AdGuardHome/wiki/Getting-Started#installation
sudo snap install adguard-home
Or,
Router: https://forum.openwrt.org/t/howto-running-adguard-home-on-openwrt/51678
Adding Tor to the Cloud gateway, or the local router.
To be continued…
https://trac.torproject.org/projects/tor/wiki/doc/TransparentProxy
https://www.linuxuprising.com/2018/10/how-to-install-and-use-tor-as-proxy-in.html
]]>The Oculus Quest is not available in the US, and even if/when it becomes available again it’s still over $400. Plus it’s limited to the Oculus store games, unless you use a USB 3.0 10ft link cable. That is why I needed an alternative setup to run virtual reality programs such as:

- Skyrim VR
- Asgards Rath
- Moss
- Hellblade: Senua’s Sacrifice
- Vanishing Realms
- Blade and Sorcery
- Super Hot
- Beat Saber
- VRChat (Multiplayer)
- Google Earth VR
The following guide is primarily for people that have no VR hardware, besides a google cardboard like phone headset, but it is still useful if you already own Gear VR, Daydream, Oculus GoQuest, etc.. I will show you how to wirelessly stream SteamVR, and Oculus titles. As well as add head, body and feet trackers. Also, play non-VR games in pseudo VR.
I will present two guides below. One for the minimum setup you’ll need, and another for a fully immersive body tracking setup.
Minimum Setup to Play VR Games

3 Degrees of Freedom (3DoF) Head Mounted Display (HMD) w/ Gamepad
This setup will allow you to look around in a VR game with orientation tracking (3 degrees of freedom), and control your movement etc with a gamepad. You can use a keyboard and mouse if you don’t have a controller. The game will not track the position of your body, just the orientation of your HMD. (Yaw, Pitch, and Roll)
It’s smart to start with this setup to test the video streaming software, etc…
Unfortunately you will still need:
Hardware
- Windows 10 computer with a Nvidia Geforce 1050ti or better.
- 5GHz WiFi AP. I use the Netgear R6220. $20 on eBay.
- An Internet connection. I use 1.5Mbps DSL.
- A smartphone. I use the LG G5. $50 on eBay.
- VR Goggle Headset like the Google Cardboard for your phone. I found mine the VR Shinecon at a thrift store for $2. You can of course use the Gear VR, Daydream, Vive Focus, Oculus Go/Quest, PSVR, etc..
- PlayStation or Xbox controller. I use a $5 PS3 Dualshock. Or, an extra android phone. I did end up buying a GearVR controller for $7 on eBay. With the added bonus of being able to use it to control my mouse on my linux desktop with this sweet little package: https://github.com/rdady/gear-vr-controller-linux
NOTE: You can use a keyboard and/or mouse instead. My goal however, was to play wirelessly.
Game Software
You will to download and install all of theses to your Windows 10 computer.
- Steam – https://store.steampowered.com/about/
- SteamVr – https://store.steampowered.com/app/250820/SteamVR/
- Oculus Store – https://www.oculus.com/setup/
- Revive Dashboard – https://github.com/LibreVR/Revive/releases
- Optional: SteamVR Advanced Settings – https://github.com/OpenVR-Advanced-Settings/OpenVR-AdvancedSettings/releases
Headset (HMD) Software
You will need to download and install ONE of the below pieces of software to your smartphone. Also, the server portion of the package to your computer. iVRy is good to start with because if it’s ease of use, and unlimited free version in black and white. If you have a Samsung Gear VR, or an Oculus Go/Quest, use ALVR. If you have an iPhone 5s or newer you might want to try out KinoVR. I use Riftcat/Vridge.
iVRy – $8
Free to try in color for 10 minutes, and black and white after. Easy to use.
Server (Steam plugin): https://store.steampowered.com/app/992490/iVRy_Driver_for_SteamVR/
Android Client: https://play.google.com/store/apps/details?id=com.mediator_software.ivry&hl=en_US
iOS Client: https://apps.apple.com/us/app/ivry/id1210129937
Riftcat/Vridge – $15 (Complete review pending…)
Server: https://riftcat.com/vridge
Android client: https://play.google.com/store/apps/details?id=com.riftcat.vridge2&hl=en_US
iOS client: https://apps.apple.com/us/app/vridge/id1458108034
Pros: Free to try for 10 minutes at a time. Can use Moonlight and ARcore. ARCore is experimental. Using phone as controller is $5. Has play non VR games in VR addon for $10 (Gamewarp). Can use Opentrack for positional tracking. Good support.
Cons: Cannot use ARCore and Moonlight at same time. Cannot use Gamewarp and Moonlight at the same time. Cannot use GearVR controller and Moonlight at the same time.
ALVR – FREE & Open Source! GearVR & Oculus Go/Quest only. Can use ARcore for positional tracking. The developer doesn’t seem to be doing anything for the last year.
Server: https://github.com/polygraphene/ALVR/releases
Client: https://github.com/polygraphene/ALVRClient/releases
Newer Quest fork: https://github.com/JackD83/ALVR
Trinus Cardboard VR – $10
Server: https://www.trinusvirtualreality.com/trinus-cardboard/#downloadtrinus
Android client: https://play.google.com/store/apps/details?id=com.loxai.trinus.test&referrer=utm_source%3Dtweb
iOS client: https://apps.apple.com/us/app/trinusvr/id1101683353
Using phone as controller is free. Can use some LED tracking with your webcam for Positional data, can also use Freepie. You can play non VR games in VR. UI in non-intuitive.
KinoVR – Claims to have 6DoF for it’s iOS version. Maybe using ARKit? Android & iOS. I don’t know anything about this project.
Intugame (No longer being developed)
https://www.quarkxr.com/past-work
Gamepad
If you want to use a PS3 Dualshock controller wirelessly over bluetooth, you’ll need to install this driver:
PS3 Dualshock Controller – https://github.com/nefarius/ScpToolkit
If you install the bluetooth driver, you will not be able to use other bluetooth devices until you remove the driver. To remove the driver follow this guide: https://forums.vigem.org/topic/250/scptoolkit-removal-guide
Xbox Controller’s should work out of the box I think.
VR Controller Software
If you don’t have a wireless gamepad lying around, but you do have an extra android phone. Turn it into a wireless controller.
Turn your Anroid phone into a 3DoF VR controller.
- Vridge Touch – Requires Vridge $5
- Trinus Hand – Requires Trinus. Free
- Google Daydream Controller Emulator – FREE https://developers.google.com/vr/daydream/controller-emulator
If you don’t have a phone on the Daydream compatibility list then you can use the a rooted AndroidOS with Magisk to install the xmlpak – a road to vendor apps module to download the daydream apps. Otherwise you can pair your phone with the emulator app to your computer using bluetooth, and use Driver4VR to connect it to SteamVR. (Although this may conflict with the Kinect skeleton tracking)
This does not work with the most recent Google Services for VR. You need to downgrade to this one: https://www.apkmirror.com/apk/google-inc/google-vr-services/google-vr-services-1-20-235017259-release/
Thank you to this thread: https://www.reddit.com/r/daydream/comments/eduszg/controller_emulator_not_working/
VR Controller Hardware
Riftcat/Vridge supports one GearVr, Oculus Go, Daydream, or Vive Focus controller. However, you have be using the GearVR, Daydream, or Vive Focus HMD respectively.
Driver4VR supports one or two PS Move, Joycon, Wii remote/nunchuck, Daydream, and GearVR controllers without any corresponding HMD. Also Leap Motion, Kinect & NoloVR. You can also use a generic bluetooth VR controller. This includes the option of virtualized hand tracking using the orientation of the controller.
GearVR driver: https://github.com/gb2111/Access-GearVR-Controller-from-PC
https://www.driver4vr.com/forums/topic/2-gear-vr-controllers-w10/
I was confused by Rucio’s reference to “IKN”, but here is how I got both controllers to work in 1909. I’m assuming he meant “IRK”. Heads up, this will mess with your computer’s registry and has the potential to break windows if done incorrectly. No one except yourself is responsible for anything that may go wrong.

* Connect one of the Gear VR controllers to Windows via the Bluetooth menu. Make a note of what the device name is, specifically the 4 letters and numbers inside the parenthesis. This should work without error.

* Regedit.exe as Administrator, navigate to ComputerHKEY_LOCAL_MACHINESYSTEMCurrentControlSetServicesBTHPORTParametersKeys. On the left, there will be a subkey (folder) under “Keys”, the name of this folder will be specific to each computer. Expand that folder with the downwards arrow. Now you should see a folder with the last 4 characters in the name matching the 4 characters in the Bluetooth menu. Open this folder.

* There is a entry with the name “IRK”. Click that and you’ll see the the attached screen. Replace the 01 at the start of each line with 02.

* Close out of Regedit and restart your computer.

You should now be able to pair the second controller without issues. You don’t need to worry about changing that value back, but you may need to remove both devices and repeat this process if you ever need to repair the controller.
See below for verification.
Full Immersive Room Scale Setup w/ 6DoF
6DoF HMD w/ two 6DoF Contollers (position emulated) two 6DoF Foot trackers w/ Virtual hip tracker. For this setup, you will need to use Riftcat/Vridge software for it’s integration with Opentrack. Unless you use Driver4VR for all body tracking. In which case you can use whichever HMD streaming package you like.
There are a number of different ways to get positional data of your HMD. Here are the ones I’ve discovered.
- ARCore (Requires ARCore compatible phone. Check here: https://developers.google.com/ar/discover/supported-devices, or a rooted phone with the Magisk ARCore/Playground Patcher module) This is the most desirable option because it uses the camera from your phone. You will need VR goggles without a front cover, or you’ll need to make a hole for the camera. I’ve heard a messy room is better. I also read you can add stickers of some kind to your walls to improve tracking. Only seems to work when you use the default streaming options, and not Moonlight. It didn’t work very well with my LG G5.
How to enable ARCore in Riftcat:
Go to RiftCat/Config folder and edit your VRidge.cfg file. Find “ArcoreTrackingEnabled” and change its value to “true”. My config was stored at: C:Program Files (x86)Riftcat 2Configvridge.cfg. How you know it is working is when your vridge app requests permission to use the camera. - PS Eye with Aruco Markers via Opentrack (This is the one I chose since I already owned a PS Eye Camera, and a laser printer)
- PS Eye with IR LED’s via Opentrack with IR filter over lens
- Kinect skeleton mode via opentrackkinect + Opentrack OR Immotion OR Driver4VR
- Kinect with color LED markers via Driver4VR
Aruco Marker Requirements:
- A printer, or some graph paper and black pen.
- Cardboard, paper, glue.
- A hat, and some sandals.
- A webcam like the PS Eye $7 X 2. Or the Xbox Kinect $10.
- Two controllers of some kind, I used GearVR controller, and another android phone with the Google Daydream Controller Emulator.
- Driver4VR software for body tracking.
Open Track Head Tracking Software
If you are not ARCore, you’ll need to use either a PS Eye or Kinect camera to track your head. Oculus Go/Quest already does this. Probably using lasers.
To enable headtracking in Riftcat you’ll need to download and install:
Opentrack: https://github.com/opentrack/opentrack
If using Kinect download and install Kinect to Opentrack – https://github.com/sheepsskullcity/opentrackkinect
Hip + Feet Tracking Software
Driver4VR – https://www.driver4vr.com/download/
Drivers
PS Eye Driver – https://github.com/jkevin/PS3EyeDirectShow (Supports multiple camera’s at once, but they are name the same, so you must initialize them in succession.)
Kinect for xbox 360 / v1:
-SDK https://www.microsoft.com/en-us/download/details.aspx?id=40278
-Runtime https://www.microsoft.com/en-au/download/details.aspx?id=40277
Kinect for xbox one / v2
– SDK https://www.microsoft.com/en-us/download/details.aspx?id=44561
– Runtime https://www.microsoft.com/en-us/download/details.aspx?id=44559
Troubleshooting Kinect 360 Download Kinect Developer Toolkit, start Kinect Tookit Browser and try Skeleton Basics application and Color Basics application – You may also run the Kinect Explorer-D2D after a computer restart to get further information from the console window that you can share screenshot https://www.microsoft.com/en-us/download/details.aspx?id=40276
Kinect for xbox one / v2: – Use Kinect Verifier https://developer.microsoft.com/en-us/windows/kinect/hardware-setup
Play non VR games in VR
Riftcat Gamewarp w/ Reshade
https://support.riftcat.com/hc/en-us/articles/360015646579
Trinus
With Reshade or VorpX
VorpX (Full review pending…)
With Moonlight, Opentrack, and OpenPIE MIU, Or Riftcat/Vridge
Reshade
With Moonlight, Opentrack, and OpenPIE MIU, Or Riftcat/Vridge
https://www.reddit.com/r/EliteDangerous/comments/4cfo37/google_cardboard_and_moonlight/
https://github.com/BlueSkyDefender/Depth3D
3D vision
With Moonlight, Opentrack, and OpenPIE MIU, Or Riftcat/Vridge
https://www.reddit.com/r/oculus/comments/7zp9hx/3d_vision_sbs_3d_for_flatscreen_games_with_the/
Cinema Mode
Nero GameVR Will just display any game in big screen mode within VR, but not actually convert game to VR.
Steam will also do this “Play in Theater”.
Also, for GearVR Oculus Go/Quest you can use the Remote Desktop app.
https://www.vrdesktop.net/
Create profile QR code for your VR Goggles
Vridge Commands
Alt+Ctrl+Shift+R – Recenter – By default it’s Alt+Ctrl+Shift+R, but it can be changed in RiftCat settings -> VRidge -> Tracking Options.
Game Specific Help for Vridge
Skyrim
https://youtu.be/Y7hRKgfAgUw – VRidge Basic Tutorial http://go.riftcat.com/SkyrimSharpness – Improve Skyrim image quality. http://go.riftcat.com/SkyrimMods – Learn how to install
Aruco Marker Generator
Turn you non Galaxy device into Gear VR compatible. Not sure if this works yet. Probably not
https://forum.xda-developers.com/mobile-vr/gear-vr/port-gear-vr-software-to-android-device-t3540402
Further Reading About Smartphone VR
https://github.com/ChristophGeske/ARCoreInsideOutTrackingGearVr/blob/master/README.md
]]>Currently, I am using scrcpy with v4l2loopback (Option 7) for the easiest and most performant way. It works with both a USB cable or over WiFi. Before that I was using gstreamer mpeg with IP Webcam android app. However gstreamer v42loopback broke with modern Ubuntu. All other options I tested had too much delay. I will be testing Android 14’s latest USB webcam option soon.
If you want to use OBS Read my previous article to install obs: https://jphein.com/how-to-install-open-broadcaster-software-obs-on-ubuntu-18-10-cosmic-cuttlefish/
Preparation for Options 1-5
I will be using the free Android app called IP webcam. https://www.google.com/url?sa=t&source=web&rct=j&url=https://play.google.com/store/apps/details%3Fid%3Dcom.pas.webcam%26hl%3Den_US%26referrer%3Dutm_source%253Dgoogle%2526utm_medium%253Dorganic%2526utm_term%253Dip%2Bwebcam%26pcampaignid%3DAPPU_1_8EL_W6TODt-r0PEPpfiBqA0&ved=2ahUKEwikhpnZu_jeAhXfFTQIHSV8ANUQ8oQBMAB6BAgMEAM&usg=AOvVaw0fuionUtSaXIOy16RhlSM9

1. Start and configure IP webcam. Run the server.
You can use either USB or Wi-Fi. My Wi-Fi is rather slow, so I’ll be using a USB cable to connect my Android phone to my Ubuntu computer.
2. The second step is to plug your phone into your computer using the USB micro or USB C cable. Then turn on USB tethering on your phone.
NOTE: Some unrooted phones do not allow you to turn on USB tethering if your current ISP does not allow it. If that is the case, you can adb port forwarding instead with this command: (USB debugging must be turned on in Developer settings.
adb forward tcp:8080 tcp:8080If you use port forwarding instead of USB tethering, or Wifi then your url portion of your uri will be localhost instead of the IP address of the phone.
Option 1 – Use built-in OBS Media Source
The delay is too great for me…


Option 2 – VLC
An easy way is by using VLC, but it seems to also create a delay on my machine. Does anyone have suggestions?
sudo apt --yes install vlc
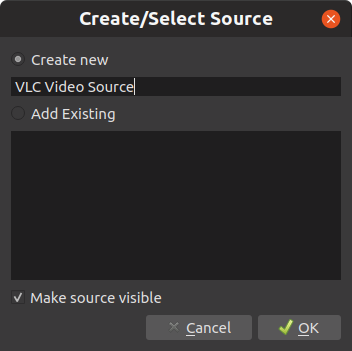
Then add a VLC media source in OBS, Click the small “+” sign, and “Add Path/URL” then paste your IP Webcam url. See below examples:
MPEG
http://192.168.42.129:8080/videofeed
ULAW (This no longer works for me)
rtsp://192.168.42.129:8080/h264-ulaw.sdp
PCM (This no longer works for me)
rtsp://192.168.42.129:8080/h264-pcm.sdp
Option 3 – Gstreamer with OBS gstreamer plugin
UPDATE: The OBS Snap now includes the gstreamer plugin! It seems to work better than before.
I noticed someone has made a Gstreamer plugin for OBS.
https://obsproject.com/forum/resources/obs-gstreamer.696/
In order to use this you’ll need to use the PPA version and not the Snap version.
Install OBS using PPA:
https://launchpad.net/~obsproject/+archive/ubuntu/obs-studioDownload the .so file from https://obsproject.com/forum/resources/obs-gstreamer.696/ and install in /usr/lib/obs-plugins/Add source “gstreamer source” in OBS.
Enter the gstreamer command in the gstreamer input box:
MPEG
souphttpsrc location="http://192.168.42.129:8080/videofeed" do-timestamp=true is-live=true ! multipartdemux ! jpegdec ! videoconvert ! video.H264 (I can’t get this to work anymore)
uridecodebin uri=rtsp://192.168.42.129:8080/h264_ulaw.sdp name=bin ! queue ! video. bin. ! queue ! audio.

maybe this?
rtspsrc location="rtsp://localhost:8080/h264_opus.sdp" protocols=tcp latency=0 onvif-rate-control=false is-live=true name=bin

bin. ! queue ! rtph264depay ! h264parse ! vaapih264dec ! videoconvert ! video.

bin. ! queue ! rtpopusdepay ! opusparse ! opusdec ! audioconvert ! audio.
H264 seems to have more delay. MPEG seems to have less delay:
Option 4 – Gstreamer with v4l2loopback
This is my favorite way. Gstreamer seems to have less delay then the OBS media plugin, VLC, or even ffmpeg. The loopback is sweet, because it let’s you treat your phone just like any other v4l2 device, like a UVC webcam. That way you can use it as a cam for Google Meet, Duo, etc…
Make sure you have gestreamer plugins installed:
sudo apt --yes install gstreamer1.0-plugins-good gstreamer1.0-plugins-bad gstreamer1.0-plugins-ugly gstreamer1.0-libav gstreamer1.0-plugins-rtp gstreamer1.0-vaapi
You can test to make sure that gstreamer connects with the IP webcam from your Android phone by issuing the below command.
gst-launch-1.0 souphttpsrc location="http://192.168.42.129:8080/videofeed" do-timestamp=true is-live=true ! multipartdemux ! jpegdec ! videoconvert ! ximagesink
Install v4loopback
sudo apt install --yes v4l2loopback-utils
sudo modprobe v4l2loopback
Create the virtual webcam
This seems to work with the MPEG stream:
gst-launch-1.0 souphttpsrc location="http://192.168.42.129:8080/videofeed" do-timestamp=true is-live=true ! multipartdemux ! jpegdec ! videoconvert ! v4l2sink device="/dev/video2"
I can’t get this one to work yet.
gst-launch-1.0 souphttpsrc location="http://192.168.42.129:8080/videofeed" do-timestamp=true is-live=true
    ! multipartdemux
    ! decodebin3
    ! videoconvert
    ! videoscale
    ! videorate
    ! video/x-raw,format=YUY2,width=640,height=480,framerate=24/1
    ! v4l2sink device="/dev/video2"
I wonder how you would receive the IP Webcam H264 stream with gstreamer? maybe:
`gst-launch-1.0 rtspsrc location='rtsp://192.168.42.129:8080/h264-ulaw.sdp' ! rtph264depay ! h264parse ! avdec_h264 ! v4l2sink device="/dev/video2"`

maybe this?

rtspsrc location="rtsp://localhost:8080/h264_opus.sdp" protocols=tcp latency=0 onvif-rate-control=false is-live=true name=bin

bin. ! queue ! rtph264depay ! h264parse ! vaapih264dec ! videoconvert ! video.

bin. ! queue ! rtpopusdepay ! opusparse ! opusdec ! audioconvert ! audio.
Use the output of OBS as a virtual webcam
NOTE: The v42lsink is now inlcuded in OBS! It’s called Start Virtual Camera, and will appear after you install v42loopback.
If you want more than one Android phone streaming to your computer using the loop-back method. You’ll have to reload the loopback mosudo modprobe v4l2loopback devices=1 video_nr=10 card_label=”OBS Cam” exclusive_caps=1dule inter kernel with a variable telling it how many loopback devices to make. For two, use the commands below:
sudo modprobe -r v4l2loopback
sudo modprobe v4l2loopback devices=2
NOTE: All this needs to be done before you add the Video Capture Device (V4L2) in OBS. If you make any changes to the video stream after you add the source, you will need to remove the source or close OBS in order to create the loopback again.
I had to use this command to get it to work with Google meet:
sudo modprobe -r v4l2loopback
sudo modprobe v4l2loopback devices=1 video_nr=10 card_label="OBS Cam" exclusive_caps=1
Option 5 – using ffmpeg
ffmpeg -i http://127.0.0.1:8080/video -vf format=yuv420p -f v4l2 /dev/video0Option 6 – using vdo.ninja
Another option is to use the 3rd party service vdo.ninja. Then add the url as a browser source to OBS.
Option 7 – using scrcpy
Install latest version: https://github.com/Genymobile/scrcpy/blob/master/doc/linux.md
optional enable wireless adb on your android phone:
plug phone into computer with usb cable and then run:
adb tcpip 5555Add loopback device:
sudo modprobe v4l2loopback devices=1 video_nr=10 card_label="scrcpy" exclusive_caps=1Configure camera: https://github.com/Genymobile/scrcpy/blob/master/doc/camera.md
For example:
scrcpy --video-source=camera --camera-id=1 --camera-size=1920x1080 --camera-fps=60 --tcpip=10.0.6.105 --v4l2-sink=/dev/video10 --no-playback Further Reading
Arch wiki has some good ideas: https://wiki.archlinux.org/title/V4l2loopback
Learn more about Gstreamer, and rtspatt here: https://medium.com/nutanix-iot/turning-a-laptop-into-an-ip-camera-de00f6b1e63
For automated script for Ubuntu from the “IP Webcam” developer see here: (Uses adb port forwarding, gstreamer, and v42loopback) https://github.com/bluezio/ipwebcam-gst/
The blog that has the working mpeg gstreamer command I used: https://cubethethird.wordpress.com/2015/12/15/using-android-camera-as-webcam-on-linux/
ustreamer: If you want to do this with a raspberry pi, or other linux computer with a webcam, instead of an android phone: https://github.com/pikvm/ustreamer
iPhone and Windows
For iPhone see: https://obsproject.com/forum/resources/ios-camera-for-obs-studio.651/ or https://apps.apple.com/us/app/ndi-hx-camera/id1477266080
For Windows see here: http://ip-webcam.appspot.com/
]]>However if you are interested in the PXE boot menu, and netbooting into a Ubuntu install here is some great info:
Alternatively,
<pre>#Add to MAC of second server your existing dhcp conf to tell it to run the installer by default when it PXE boots
[<mac address>]
filename /ubuntu-installer/amd64/pxelinux.0
#Log in remotely into second server, after install
ssh ubuntu@<ip from dhcp syslog> -p ubuntu
</pre>
General Info
* Create PXE menu installer for both client and server.
* Client –> LTSP menu (default)
* Install boxen baby (wifi or vpn remote) client — ubuntu bionic desktop minimal install with xfreerdo-ngihtly
* Install boxen brain server — preseeded ubuntu with boxen install script
* Boot first HD
* netboot.xyz https://netboot.xyz/booting/tftp/
https://wiki.ubuntu.com/UEFI/PXE-netboot-install
https://help.ubuntu.com/community/UbuntuLTSP/LTSPMultiboot
* Create Preseed file for PXE installers.
https://diegolemos.net/2017/08/06/pxe-booting/
https://help.ubuntu.com/lts/installation-guide/example-preseed.txt
https://gist.github.com/skx/ecc3a429eb11a3c7f022
https://help.ubuntu.com/lts/installation-guide/armhf/apbs02.html
https://www.syslinux.org/wiki/index.php?title=PXELINUX
#ltsp: This is the place for support of LTSP. Ask your question and hang around for an answer. Check IRC logs at http://irclogs.ltsp.org
[19:56] == jphein [b8178628@gateway/web/freenode/ip.184.23.134.40] has joined #ltsp
[19:56] -ChanServ- [#ltsp] Welcome to the Linux Terminal Server Project's irc channel
[19:58]  Hello to everyone. =] I have a nice LTSP install in KVM. It's using Ubuntu 18.04.1, with the chrootless dnsmasq proxy method
[19:59]  However, when I run ltsp-update-kernels my pxe config doesn't pick up the changes I make in /etc/ltsp/udpate-kernels.conf
[20:00]  my /var/lib/tftpboot/amd64pxelinux.cfg/ directory remains unchanged
[20:01]  When I make the changes directly in the files it works well
[20:09]  Am I missing something?
[21:56]  jphein: yes, /usr/share/ltsp/update-kernels
[21:56]  This transfers /etc/ltsp/update-kernels.conf to /boot/pxelinux.cfg/default
[21:56]  Then ltsp-update-image puts it in /opt/ltsp/images/amd64.img
[21:57]  And finally ltsp-update-kernels gets it from amd64.img and puts it to tftp
[21:57]  Thank you! I'll try it out. =]
[21:57]  It's so complicated that I wanted to get rid of it and just use a static file :D
[21:59]  hahaha
[22:08]  So it never goes to /var/lib/tftpboot/ltsp/amd64/pxelinux.cfg/ ?
[22:17]  I'd like to install Ubuntu as a pxe option before my ltsp menu
[22:32]  jphein: sure, it goes to pxelinux.cfg after the 4 steps I mentioned above
[22:38]  lol!
and
#ltsp: This is the place for support of LTSP. Ask your question and hang around for an answer. Check IRC logs at http://irclogs.ltsp.org
[21:36] == jphein [b8178628@gateway/web/freenode/ip.184.23.134.40] has joined #ltsp
[21:36] -ChanServ- [#ltsp] Welcome to the Linux Terminal Server Project's irc channel
[21:37]  Hello! =] Does anyone know where I would put my install-ubuntu kernels so that update-kernels picks them up and presents them on the PXE menu?
[21:39]  Or, do I have to edit the pxelinux.cfg/default symlink manually?
[21:39] == vagrantc [~vagrant@unaffiliated/vagrantc] has joined #ltsp
[21:41]  This is my https://github.com/jphein/boxen/blob/master/etc/ltsp/update-kernels.conf
[21:44]  I suppose I can edit my dnsmasq.d/ to add the mac address of the client I'd want to install. With the ubuntu-install pxe boot config.
[21:48]  I'm also having issues with the chrootless method in the Azure cloud. Seems the Azure kernel may not have all the right input drivers for KVM?
[22:25]  jphein: I'm not sure what you're asking; why do you need more than one kernel?
[22:25]  If you only keep one kernel, then ltsp will pick them up
[22:26]  Now if you want multiple kernels, ltsp will pick up the latest
[22:26]  Sorry, let me rephrase that. Do you know of a simple way to present the PXE client user with a menu to install Ubuntu?
[22:26]  So if e.g. azure has 4.1, and you manually install 4.15, then the server will have 4.1 and the clients 4.15, without involving any configs
[22:26]  cool
[22:26]  jphein: ah sure, you just expose the .iso etc
[22:27]  But the "ltsp way to install a client" is to netboot it and cp -a /run/initramfs/rofs /target
[22:27]  I.e. to clone the ltsp image...
[22:27]  that's exactly what i want
[22:28]  You can also easily netboot it, and run: kvm -cdrom /path/to/windows -hda /dev/sda, so that you can even install windows while booted as an ltsp client
[22:28]  All those don't involve pxelinux at all
[22:28]  You do those via epoptes after the client boots normally via ltsp
[22:28]  oh yes kvm
[22:28]  (or locally)
[22:29]  with epoptes
[22:29]  nice
[22:29]  I usually don't want to leave my chair, so I do all clients via epoptes
[22:29]  haha =]
[22:29]  So I can be installed 3 different OSes on 3 clients without me going there
[22:30]  *I can install, meh
[22:30]  I can be installing. OK, got it :P
[22:30]  thank you , again!
[22:30]  np
[22:30]  I like that solution a lot.
[22:31]  Do you know the simplest way to preseed an Ubuntu installation with a few changes?
[22:32]  wcp -a /run/initramfs/rofs /target
[22:32]  Do I make a screen script?
[22:33]  jphein: let's clear something up
[22:34]  cp is for cloning the ltsp image
[22:34]  kvm is for installing ubuntu from an .iso
[22:34]  preseeding only applies to the iso
[22:34]  So which one are you asking about?
[22:35]  hahaha, I'm just very curious
[22:35]  =]
[22:35]  i like all of them
[22:35]  but I want to know more about the cp -a
[22:35]  it's a simple as that?
[22:36]  cloning
[22:36]  I don't make screen scripts for such simple things; I do make scripts that I run either from epoptes or directly from the client
[22:36]  cp, add user, install grub
[22:36]  You can also have a vm on the server, and use dd, to avoid all that
[22:36]  oh i see
[22:37]  using qcow?
[22:37]  or raw img
[22:37]  E.g. I have bionic-mate in vbox, then i expose it via nbd, and I dd if=/dev/nbd2 of=/dev/sda on the clients, and it's ready
[22:37]  Both can be done, qemu-nbd supports qcow and vdi and vmdk and raw
[22:38]  so many ways
[22:38]  that is the one i'll use since I already have the vm
[22:38]  You can even login normally as a user on the client, so that your image is accessible by sshfs in /home/username
[22:38]  So then you do dd if=/home/username/vms/myvm of=/dev/sda, done
[22:38]  No scripts, no screen scripts, nothing
[22:39]  You may only need to resize2fs /dev/sda1 afterwards, so that it extends to all the disk size
[22:39]  right
[22:41]  and you're doing this in a user with sudo privledges or something?
[22:41]  yes
[22:41]  Yup, with LDM_HASH_PASSWORD=True; or via epoptes :)
[23:34]  Which commands do you run after a cp -a /run/initramfs/rofs /target ? Install grub?
[00:16]  jphein: mount /dev/sda1 /mnt; cd /mnt; for d in proc sys dev dev/pts; do mount --bind /$d $d; done; chroot . dpkg-reconfigure grub-pc; umount dev/pts dev sys proc
]]>
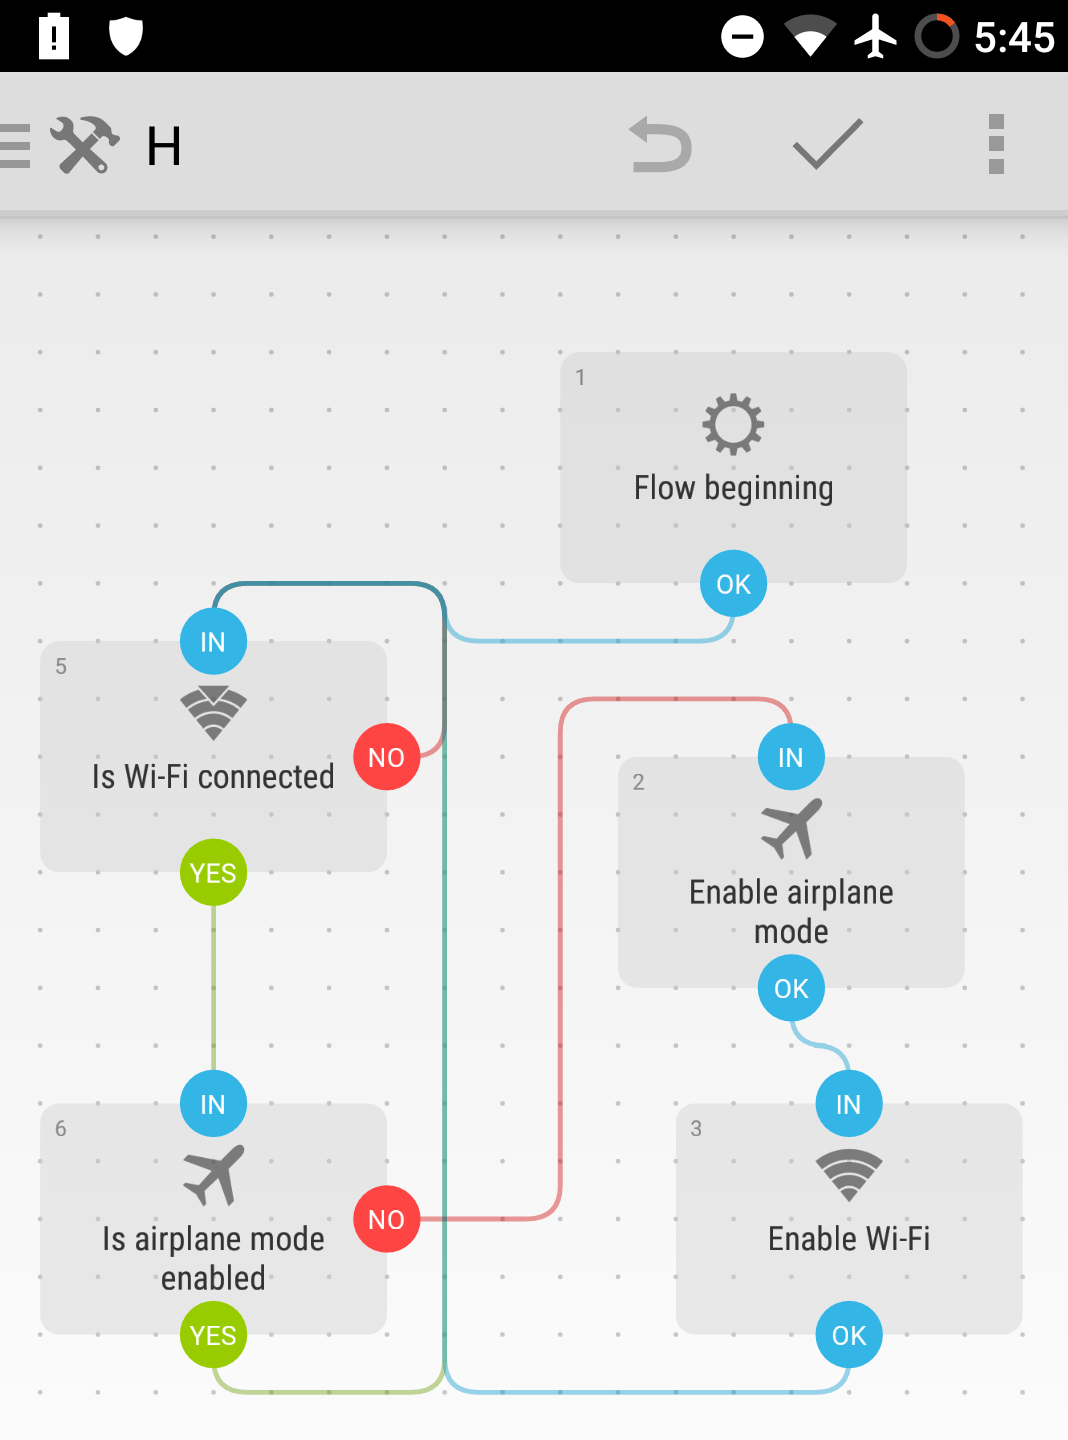
- Run the flow, Turn off logging, and check “start running flows on device boot”.
Requirements:
- A Netgear WNDR4300SW device, and 12v 2.5a power supply.
- A Linux computer (Ubuntu 18.10) with an ethernet jack
- An Android phone with a 5GHz radio (Nexus 5) with OS that allows USB tethering (LineageOS 14.1)
- Micro USB cable.
- A Cat5/e/6 cable.
- A working internet connection with an ethernet jack free.
- At least one 110v plug free to run the router.
- Incredible patience.
Installing OpenWRT on the WNDR4300SW
-
- Download the OpenWRT two images from here: https://openwrt.org/toh/views/toh_fwdownload?dataflt%5BModel*~%5D=wndr4300
- Compile the C Program used to modify the WNDR4300 firmware for the WNDR4300SW. (Thank you to all the fine, smart folks here: https://gist.github.com/aplocher/7d717925fe00c6602bed) , and modify the WNDR4300 factory firmware with this pasted into a terminal:
wget https://raw.githubusercontent.com/jphein/wndr4300sw/master/patch4300V1.0.0.6SW.c
gcc -o 4300sw patch4300V1.0.0.6SW.c
chmod u+x 4300sw
./4300sw openwrt-18.06.1-ar71xx-nand-wndr4300-ubi-factory.img
- Reset the router to factory defaults by holding down the reset button with a paperclip for 30 seconds.
- Connect either via ethernet orusing the default SS Use the URL: http://192.168.1.1.
I was unable to access the router via telnet using this: https://wiki.openwrt.org/toh/netgear/telnet.console, but thanks to Todd Nestor, I was able to get the default username and password from his article here: http://toddnestor.com/hacking-the-netgear-wndr4300-router/ The stock WNDR4300SW default credentials (username/password) are admin/cciadmin . Upload the factory image using the firmware update feature. - OR, use the TFTP option here: https://oldwiki.archive.openwrt.org/toh/netgear/wndr4300
-
set a static IP on your computer, i.e 192.168.1.35, and connect the ethernet cable to the router
-
power on the router
-
press and hold the RESET button as soon as the switch LEDs light up.
-
keep holding RESET until the power LED begins to flash orange and then green.
-
once the power LED is flashing green, release RESET
-
start the TFTP transfer to router at 192.168.1.1. In your computer execute:
sudo apt install tftp-hpa
tftp 192.168.1.1 -m binary -c put openwrt-18.06.1-ar71xx-nand-wndr4300-ubi-factory.img
- log on to openwrt and upgrade using the openwrt-18.06.1-ar71xx-nand-wndr4300-squashfs-sysupgrade.tar
-
Installing Lineage OS on the Nexus 5
- This is well documented here: https://wiki.lineageos.org/devices/hammerhead/install
- Turn off lock screen
- Enable auto USB tether using Automate: https://android.stackexchange.com/questions/127930/automatically-tether-usb
- Run the flow, Turn off logging, and check “start running flows on device boot”.
Connecting and Configuring
-
- Connect smartphone to wifi Hotspot with Micro USB cable.
- Enable USB tethering in router and smartphone: https://openwrt.org/docs/guide-user/network/wan/smartphone.usb.tethering
-
ssh [email protected]- Connect router to internet via it’s WAN port
-
opkg update
opkg install kmod-usb-net kmod-usb-net-rndis kmod-usb-net-cdc-ether
uci set network.TetheringWAN=interface
uci set network.TetheringWAN.proto='dhcp'
uci set network.TetheringWAN.ifname='usb0'
uci set firewall.@zone[1].network='wan wan6 TetheringWAN'
uci commit
-
- Enable Wireless
If later you want to just use the router you can use the 5GHz radio and change the MAC to the authorized Nexus 5. Using: https://gist.github.com/rcg4u/91cb1a17750397082910180aa075a12e
]]>